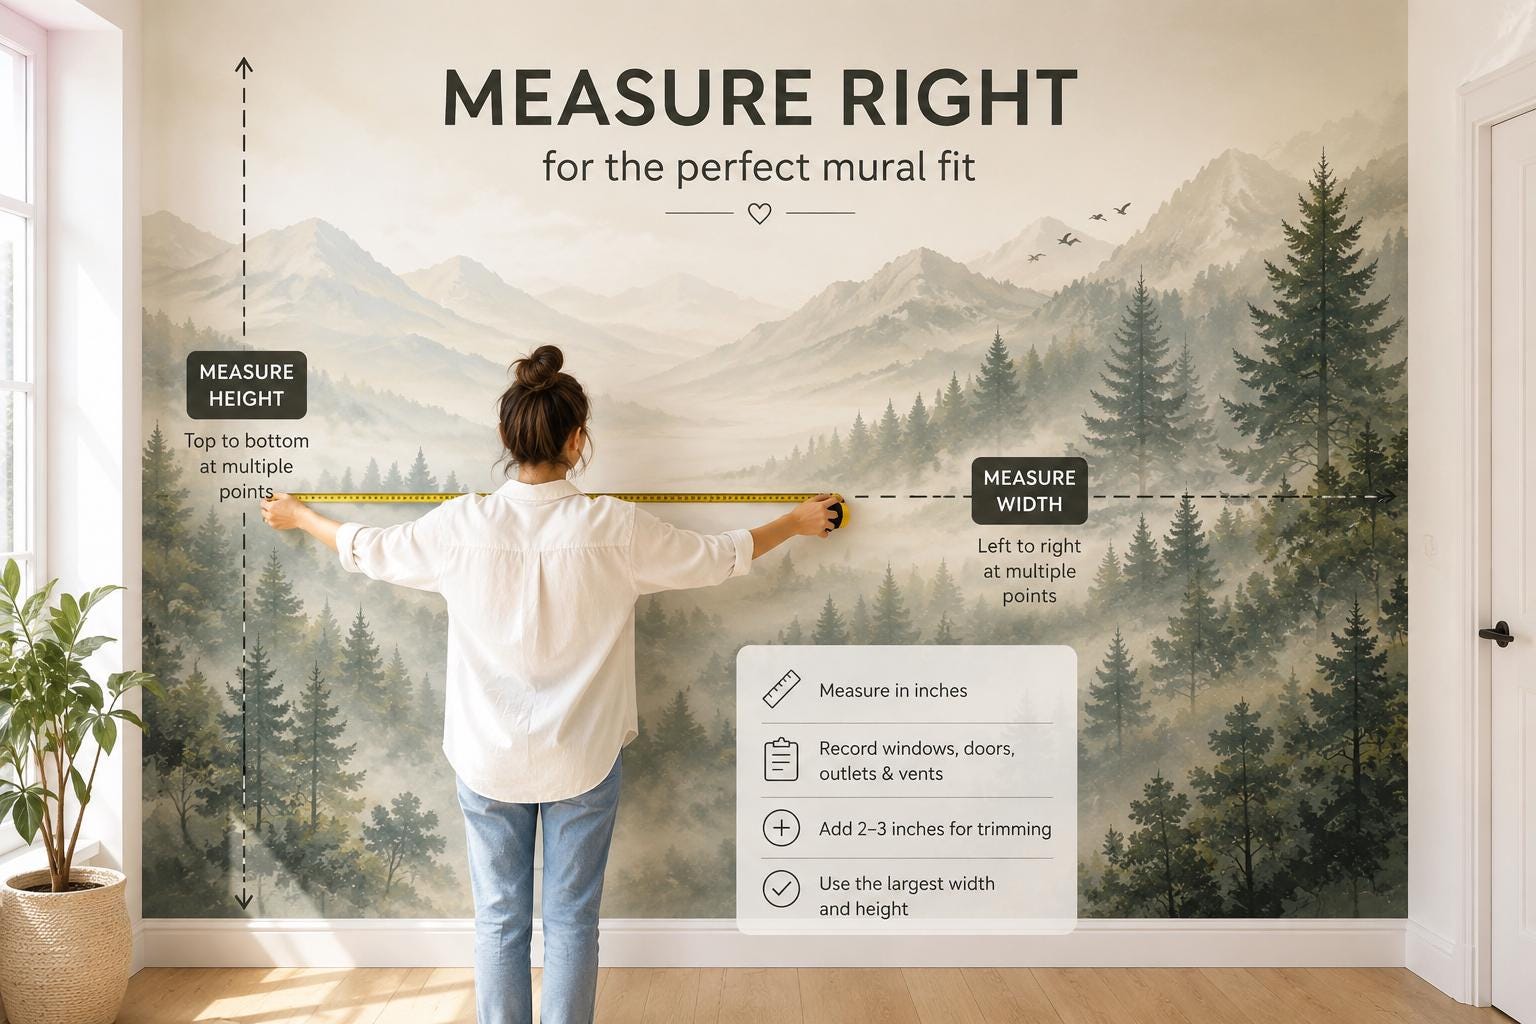
A mural can make a nursery feel like a storybook, give a home office a stronger point of view, or turn an ordinary bedroom wall into the room’s focal point. But before choosing a dreamy botanical, a city map, or a bold abstract design, you need accurate dimensions. Learning how to measure wall murals is the step that protects the final look - especially when your mural is custom made to fit your space.With peel-and-stick wall murals, a little extra material is usually far more helpful than a too-tight fit. Walls are rarely perfectly square, ceilings can slope, and floors are not always level. Measure carefully, allow for trimming, and you will have the flexibility to create clean edges during installation.
What You Need to Measure a Wall Mural
Keep the process simple. You will need a metal tape measure, a pencil, paper or your phone for notes, and a second person for tall or wide walls. A metal tape measure is more reliable than a fabric measuring tape because it stays straight across longer spans.Measure in inches unless the product ordering instructions specifically request another unit. Write every measurement down as you take it, including the location of doors, windows, outlets, vents, and built-in features. You may not need to subtract those elements from your order size, but noting them helps you plan the installation and decide where the design should sit.Before measuring, clear enough space to reach each wall edge. You do not have to remove baseboards, trim, or crown molding. In fact, measuring from their visible boundaries can help you understand exactly where the mural will be trimmed.
How to Measure Wall Murals: Width First, Then Height
For a standard rectangular accent wall, measure the full width from the far-left edge to the far-right edge. Then measure the full height from the highest point you want covered to the lowest point you want covered.Do not assume a wall is square based on one width and one height measurement. Take width measurements at the top, middle, and bottom of the wall. Then take height measurements at the left side, center, and right side. Use the largest width and largest height when placing your order.For example, a wall may measure 119 inches wide near the ceiling, 120 inches at the center, and 121 inches near the baseboard. Its heights may range from 95 to 96 inches. Order based on 121 inches wide by 96 inches high, then include a small allowance for trimming if your custom ordering process permits it.A practical rule is to add 2 to 3 inches to both width and height for a typical wall. That extra material gives you room for slight variations, uneven corners, and a clean final trim. If your wall is noticeably out of square, has an uneven ceiling line, or is in an older home, consider allowing a little more.The trade-off is simple: ordering too much leaves material that can be trimmed away, while ordering too little can leave an exposed strip of wall that no amount of careful installation can hide. Since made-to-order murals are produced to your selected dimensions, it is worth double-checking before you submit an order.
Measure the Area You Want Covered
A mural does not always need to run from wall to wall. Perhaps you want a celestial design above a crib, a personalized name mural behind a bed, or a soft floral scene framed by painted wall space. In that case, measure only the intended mural area, not the full wall.Mark the planned top, bottom, and side edges lightly with painter’s tape before measuring. Step back and look at the proportions from across the room. This is particularly helpful above furniture, where a centered mural can look more intentional than one that simply follows the full wall dimensions.Keep furniture placement in mind, but do not measure around it. If a mural is intended to extend behind a headboard, console, or desk, measure the complete area behind the furniture. Installing a continuous design creates a more finished result and gives you more flexibility if you rearrange the room later.
Measuring Walls With Doors, Windows, and Outlets
For most full-wall murals, measure the entire wall as one rectangle. Do not subtract the width or height of windows, doors, closets, or other openings. The mural material is installed over the full area, and the openings are trimmed out during installation.This approach keeps the artwork continuous. It also makes alignment easier because you are working with full vertical panels rather than trying to fit separate pieces around interruptions. A leafy mural, skyline, or safari scene will look more natural when its pattern flows across the wall.Measure and note the exact location of each opening anyway. Record the distance from the left edge of the wall to the opening, its width, and its height. This lets you plan where a key feature in the artwork may land. If a design includes a large moon, a child’s name, an animal face, or a map label, you may prefer that detail not to be cut through by a window or door.Outlets, switches, and vents are handled the same way: include them in the total mural dimensions, then cut around them during installation. Turn off power at the breaker before removing outlet or switch covers. For a clean result, use a sharp utility knife and trim slowly once the mural is adhered around the opening.
When an Opening Changes the Plan
There are exceptions. A narrow strip above a doorway, a wall broken into separate sections by a fireplace, or a tiny area between built-ins may be better treated as individual mural sections. In these cases, measure each section separately and consider whether the design needs to align across the gaps.If you are ordering a personalized mural or a design with a specific focal point, plan the layout before selecting dimensions. A custom-sized print can give you better control over how the artwork appears in the finished room, but the wall measurements still need to reflect the real installation area.
How to Measure Sloped, Angled, or Uneven Walls
Sloped ceilings and angled walls add personality to a room, but they require more thoughtful measuring. Start by measuring the widest point and the tallest point of the full area. A mural can be ordered as a rectangle and trimmed to follow the slope during installation.For a sloped ceiling, measure the wall’s maximum width, then measure the height at several points across the wall. Sketch the slope and write each height on your drawing. Order enough height to cover the tallest point, plus trimming allowance.For a wall with a diagonal edge, such as a stairwell, measure the overall rectangle that contains the entire shape. You will trim away the excess after applying the mural. This method uses more material than ordering a custom-cut shape, but it creates a continuous print and is generally easier to install accurately.Uneven plaster, wavy ceilings, and older baseboards call for a generous trim allowance. Resist the urge to cut the mural to your wall measurements before applying it. Apply the panels with extra material extending beyond the edge, then trim at the end with a sharp blade and a straightedge.
Measure More Than Once Before Ordering
The most common measuring mistake is rushing through one set of dimensions. Measure once, write everything down, then measure again from the opposite direction or on another day. If the numbers differ, use the larger measurement and investigate why.It also helps to check whether your wall has crown molding, a baseboard, or a chair rail that affects the visible area. Decide whether the mural should sit inside those boundaries or extend behind removable trim. Most DIY installations are easiest when the mural covers the flat wall surface and is trimmed neatly at the molding line.If you are decorating a rental, consider your exit plan as well as the immediate look. Peel-and-stick murals are designed for smooth, properly prepared surfaces, but adhesion can vary on textured walls, fresh paint, dusty surfaces, or walls with peeling paint. Measure only after confirming that your chosen wall is a suitable surface for removable self-adhesive material.
Check Your Design Scale Before You Commit
Dimensions determine more than whether the mural covers the wall. They also affect the scale of the artwork. A delicate repeating floral may feel airy across a large dining-room wall, while a large-scale tropical leaf print can create a dramatic boutique-hotel effect in a smaller powder room or entryway.Samples are useful here. They let you see the color in your home’s natural and evening light, feel the material, and test adhesion on the intended smooth wall surface. A sample cannot replace full measurements, but it can prevent a color or finish surprise after your mural is made.For designs with names, initials, quotes, maps, or other personalization, review spelling and placement details as carefully as your dimensions. Made-to-order decor is what makes a wall feel truly yours, but it also means the order should be checked closely before production begins.A well-measured mural gives you more than enough coverage - it gives your installation room to look polished. Take the extra few minutes to measure at several points, order for the largest dimensions, and let the final trim reveal the design exactly where it belongs.