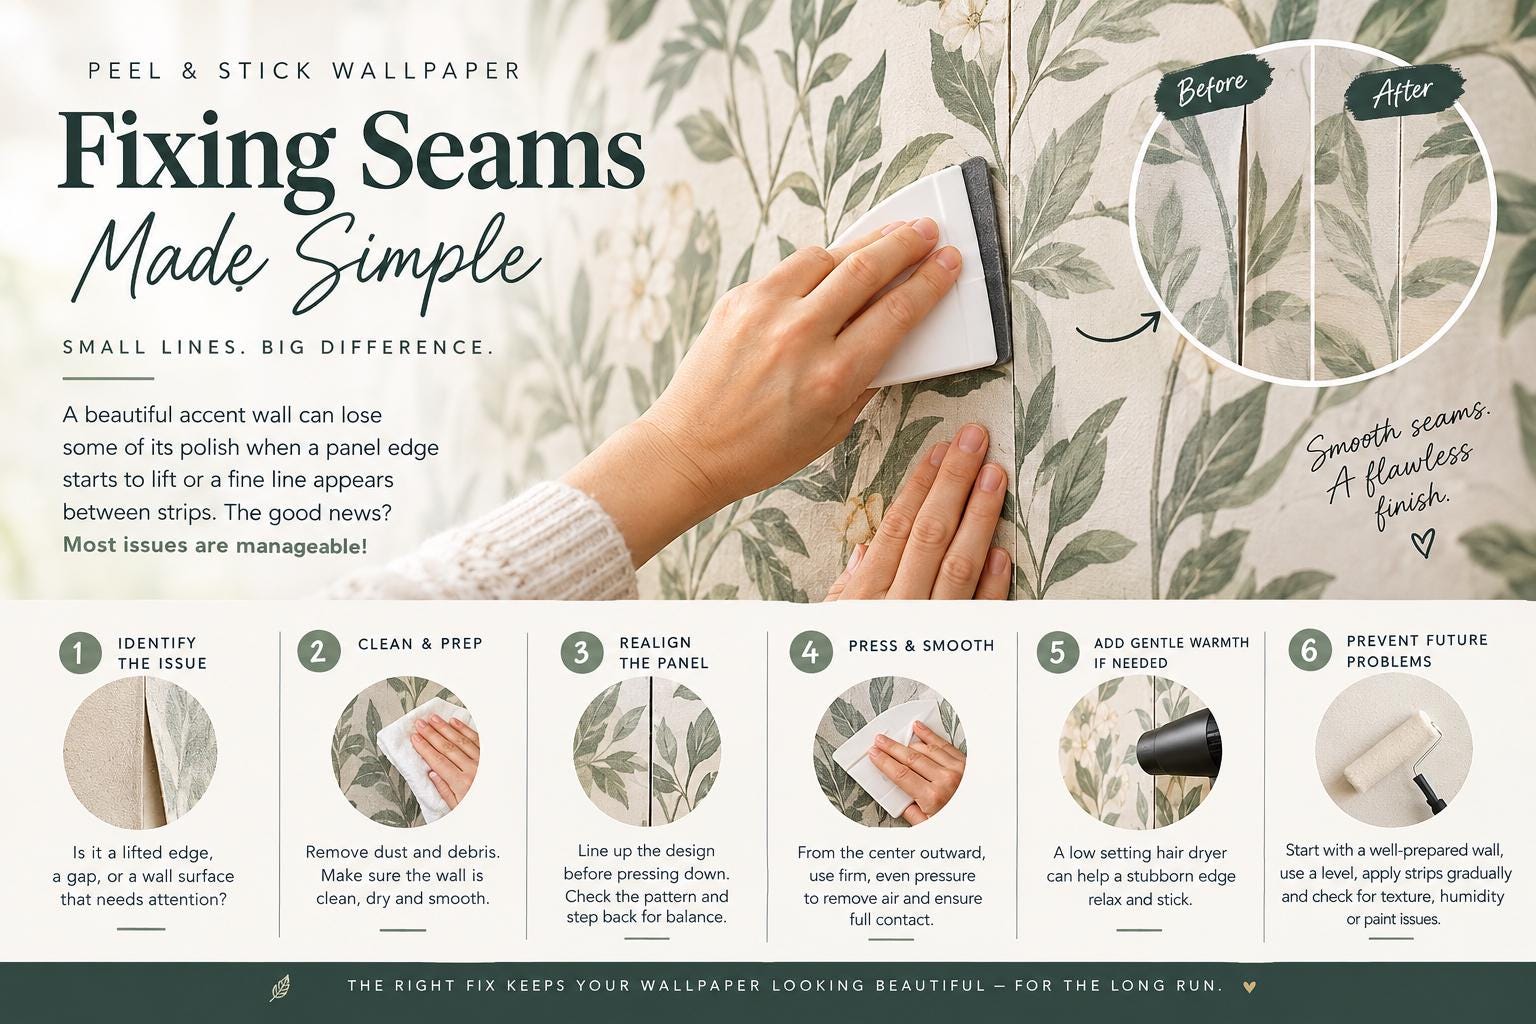
A beautiful accent wall can lose some of its polish when one panel edge starts to lift or a fine line appears between strips. The good news is that most issues are manageable. To fix peel and stick seams, start by identifying whether you are dealing with a loose edge, a gap between panels, or a wall surface that is working against the adhesive. Each calls for a slightly different approach.Peel-and-stick wallpaper is designed to make a high-impact room update feel approachable, but it still benefits from a careful hand. A little patience, clean tools, and gentle pressure can often bring panels back into alignment without turning a small detail into a larger repair.
First, identify what is happening at the seam
A seam is the meeting point between two wallpaper panels. It should lie flat, with the design lined up cleanly from one panel to the next. Do not assume every visible line is an adhesive failure. Some patterns make the panel edge more noticeable than others, especially dark, high-contrast, or geometric designs.
A seam that is lifting
If the edge curls away from the wall, dust, humidity, wall texture, or incomplete pressure during installation may be the cause. This is most common near corners, around air vents, in bathrooms with frequent steam, or on walls that were not fully clean and dry before application.A lifting seam can usually be addressed while the panel is still in good condition. Work slowly. Pulling at a curled edge or pressing it down over debris can crease the material or leave an uneven finish.
A seam with a gap
A narrow gap means the panels are no longer touching as intended. It may have happened because a panel was installed slightly off-plumb, because the material shifted during application, or because the wall itself is not perfectly straight. Older homes often have walls and corners that look square from across the room but tell a different story once wallpaper is installed.Do not stretch the wallpaper aggressively to close a gap. Stretching can distort the print, create tension in the panel, and lead to another lifted edge later. A very small gap may be less noticeable than a pattern that has been pulled out of shape.
How to fix peel and stick seams without damaging the panel
Start with clean, dry hands and good lighting. You will want to see the exact edge of the panel and any dust caught beneath it. If the room is cold, let it warm to a comfortable indoor temperature first. Adhesive can be less cooperative on a chilly wall.
Gently lift only the affected section
If an edge is lifting, carefully peel back only the loose portion. Avoid pulling the entire panel away from the wall unless the alignment problem extends far beyond the seam. Supporting the material close to the wall helps prevent a sharp bend or crease.Inspect both the wall and the adhesive side of the wallpaper. Remove visible lint, drywall dust, pet hair, or other debris with a dry, lint-free cloth. Do not use water, household cleaners, or oily products directly on the adhesive.If the wall feels dusty or slightly greasy, clean that small area with a mild wall-safe cleaner, then allow it to dry completely before reapplying the panel. Moisture trapped behind the wallpaper is not a shortcut to better adhesion.
Reposition before pressing
Line the panel edge up with its neighboring strip before committing to pressure. For a floral or botanical print, check a recognizable leaf, stem, or bloom near the seam. For a mural, use a clear visual landmark such as a roofline, star cluster, or animal outline. On a repeating pattern, step back a few feet to make sure the overall rhythm looks right.Once aligned, press the panel onto the wall from the center of the loose area outward. Use a wallpaper smoothing tool or a clean, soft cloth, applying firm but controlled pressure. This helps push out air and encourages full contact along the seam without scratching the surface.
Add gentle warmth if needed
For a stubborn edge, mild warmth can help the material relax and conform to the wall. Use a hair dryer on a low setting, held several inches away, and move it continuously across the area for a few seconds. The goal is gentle warmth, not heat.Press the seam down while the wallpaper is slightly warm, then hold it in place with your hand for a moment. Avoid high heat, which can damage the print, overly soften the adhesive, or cause the material to stretch.
Treat a tiny gap with restraint
When there is a small gap but both panels are flat and well-adhered, assess it from normal viewing distance before making a repair. A line that feels obvious when you are standing inches away may disappear once furniture, art, and everyday life return to the room.If a gap is caused by slight misalignment and the panel can be repositioned without strain, lift the nearest portion gradually and reset it. If closing the gap would disrupt the pattern or put tension on the panel, leave the material relaxed. Flat, correctly matched wallpaper usually looks better over time than wallpaper that has been forced into place.
When the wall surface is the real issue
Peel-and-stick wallpaper performs best on smooth, clean, dry, properly prepared walls. Heavy orange-peel texture, deep texture, crumbling drywall, flaking paint, and porous unfinished surfaces can prevent a seam from making consistent contact.Freshly painted walls also need time to cure fully before wallpaper goes up. Paint that feels dry is not always fully cured beneath the surface, and residual moisture or off-gassing can affect adhesion. If seams are lifting across multiple panels, rather than in one isolated spot, pause before attempting repeated repairs. The surface may need more preparation.High-humidity conditions are another factor. A powder room, laundry area, or kitchen can still be a stylish place for peel-and-stick wallpaper, but frequent steam and poor ventilation create more demanding conditions. Consider whether the lifting edge sits near a shower, sink, vent, or exterior-wall condensation point.
Prevent seam problems on your next wall
The best seam repair is the one you never need. Before installation, wipe the wall down and let it dry fully. Check for loose paint and sand away small bumps that could keep the wallpaper from lying flat. Measure the wall carefully, including any changes around windows, doors, or built-ins.During installation, use a level or plumb line to position the first panel. That first panel sets the direction for every panel after it. Even a slight tilt can become a visible gap by the time you reach the end of a long wall.Apply each strip gradually rather than removing all backing paper at once. Smooth from the center outward as you go, and pay special attention to the top, bottom, and panel edges. Press along every seam again once the wall is complete.For a custom mural or a large-scale print, lay out the panels in order before you begin. This gives you a chance to understand where the artwork connects and prevents an avoidable panel-order mistake. Ordering a sample first is also a practical way to check color, finish, and how the material feels on your specific wall surface. WallpaperCraftWorks designs are made to order, so confirming measurements and surface suitability before ordering supports a more confident installation.
When replacement is the better choice
A panel may be difficult to salvage if it has a permanent crease, a torn edge, heavy debris embedded in the adhesive, or a major pattern mismatch. Likewise, if several seams keep lifting after careful cleaning and re-pressing, replacing the affected panel after addressing the wall condition may deliver a cleaner result than repeated fixes.Take a close look at the room as a whole before deciding. A flawless wallpaper wall is a lovely goal, but it does not require perfection under a magnifying glass. With a properly prepared smooth wall and a calm, measured reset, those seams can fade back into the design and let the pattern take center stage.